Automating Pull Request Descriptions with OpenAI and Vercel
In this tutorial, we'll build a PR description generator with the OpenAI Responses API and deploy it on Vercel. Treat each generated description as a draft that the pull request author should verify.
What This Bot Does
Our bot will:
- Listen for pull request events on GitHub via webhooks.
- Fetch the PR’s changed files.
- Generate a concise PR description using OpenAI.
- Automatically update the PR description.
This is a standalone feature and does not require the previous PR reviewer bot, but if you're interested in AI-assisted PR reviews, check out this tutorial. 🚀
Prerequisites
Before starting, ensure you have:
- A GitHub account
- A Vercel account (for easy deployment)
- An OpenAI API key
- Node.js installed on your machine
Writing a Good Prompt
To get high-quality PR descriptions from OpenAI, it's crucial to craft a well-structured prompt. A good prompt should:
- Clearly define the task (e.g., "Summarize the following code changes into a concise PR description.")
- Include context about the code changes (e.g., file diffs, modified lines)
- Specify the desired format (e.g., bullet points, a paragraph, or specific sections)
This ensures that OpenAI understands the intent and generates a useful summary.
1Summarize the following code changes into a concise PR description. Include:21. A high-level overview of what was modified.32. The key improvements or fixes.43. Any breaking changes or important considerations.56 Changes:7[file - diffs]
Understanding the OpenAI API Call
For new integrations, OpenAI recommends the Responses API. These parameters matter in this example:
- model: Selects the model. Keep it in an environment variable so it can be changed without editing code.
- instructions: Defines the task and output requirements.
- input: Contains the pull request diff.
- max_output_tokens: Limits the response length and helps control cost.
Example API call:
1const aiResponse = await openai.responses.create({2 model: process.env.OPENAI_MODEL || "gpt-5.6-sol",3 instructions: "Summarize the code changes as a concise, factual PR description. Do not invent behavior that is not visible in the diff.",4 input: fileDiffs,5 max_output_tokens: 300,6});78const description = aiResponse.output_text;
Step 1: Setting Up the Project
Create a new directory and initialize the project:
1mkdir github-pr-describer2cd github-pr-describer3npm init -y4npm install @octokit/rest openai dotenv express
Step 2: Handling Webhooks
Create an api directory for our webhook handler:
1mkdir api
Then, create api/webhook.js and add the following code:
1const express = require('express');2const { Octokit } = require('@octokit/rest');3const OpenAI = require('openai');4const { verifyWebhookSignature } = require('../utils/security');56const router = express.Router();7const octokit = new Octokit({ auth: process.env.GITHUB_TOKEN });8const openai = new OpenAI({ apiKey: process.env.OPENAI_API_KEY });910const prompt = `11Summarize the following code changes into a concise PR description. Include:121. A high-level overview of what was modified.132. The key improvements or fixes.143. Any breaking changes or important considerations.1516 Changes:17[file - diffs]`;1819router.post('/webhook', async (req, res) => {20 try {21 verifyWebhookSignature(req);22 const { pull_request, repository, action } = req.body;2324 if (!pull_request || !['opened', 'ready_for_review'].includes(action)) {25 return res.status(400).send('Not a relevant PR event');26 }2728 const owner = repository.owner.login;29 const repo = repository.name;30 const prNumber = pull_request.number;3132 // Fetch PR files33 const { data: files } = await octokit.pulls.listFiles({ owner, repo, pull_number: prNumber });34 const fileDiffs = files.map(f => `${f.filename}:\n${f.patch}`).join('\n');3536 // Generate PR description using OpenAI37 const aiResponse = await openai.responses.create({38 model: process.env.OPENAI_MODEL || "gpt-5.6-sol",39 instructions: prompt,40 input: fileDiffs,41 max_output_tokens: 300,42 });4344 const newDescription = aiResponse.output_text;4546 // Update PR description47 await octokit.pulls.update({ owner, repo, pull_number: prNumber, body: newDescription });4849 res.status(200).send('PR description updated');50 } catch (error) {51 console.error(error);52 res.status(500).send('Something went wrong');53 }54});5556module.exports = router;
Step 3: Securing Webhooks
Create a utils/security.js file to verify GitHub’s webhook signature:
1const crypto = require('crypto');23const verifyWebhookSignature = (req) => {4 const signature = req.headers['x-hub-signature-256'];5 if (!signature) throw new Error('No signature found');67 const hmac = crypto.createHmac('sha256', process.env.WEBHOOK_SECRET);8 const digest = 'sha256=' + hmac.update(JSON.stringify(req.body)).digest('hex');910 if (signature !== digest) throw new Error('Invalid signature');11};1213module.exports = { verifyWebhookSignature };
Step 4: Setting Up Secrets
Create a .env file in the project root:
1GITHUB_TOKEN = your_github_token2OPENAI_API_KEY = your_openai_api_key3WEBHOOK_SECRET = your_random_secret
Generate a random secret using:
1openssl rand -hex 20
Step 5: Deploying to Vercel
Create a vercel.json file:
1{2 "version": 2,3 "functions": {4 "api/*.js": {5 "maxDuration": 606 }7 },8 "routes": [9 {10 "src": "/webhook",11 "dest": "/api/webhook.js"12 }13 ]14}
Deploy using:
1vercel login2vercel
Add your environment variables in Vercel’s Project Settings → Environment Variables.
Step 6: Configuring the GitHub Webhook
- Go to your repo → Settings → Webhooks
- Click Add webhook
- Set the Payload URL to https://your-vercel-url/webhook
- Choose application/json as the content type
- Enter your WEBHOOK_SECRET
- Select Pull request events
- Save it 💾
Testing It Out
- Open a new pull request.
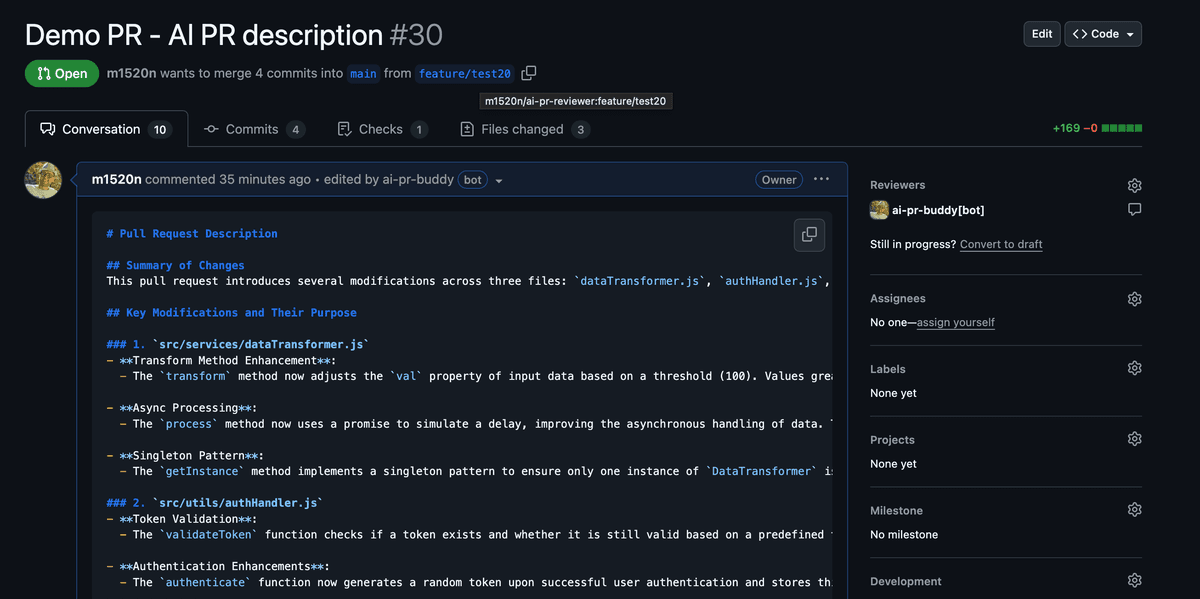
- The bot will generate and update the PR description!
You can check an example PR with AI description here.
What’s Next?
This is just the beginning! You could:
- Add customizable summary styles
- Support different AI models
- Improve description formatting
Want to add AI-powered PR comments too? Check out this tutorial. 🎯

Michał Winiarski
Founder of Devbrains and senior software developer